PDF Template
You can create PDFs for your gift vouchers, using a template that you have total control over.
Start by ensuring you've set up the Voucher PDF Template under the General Settings for Gift Voucher.
Also check out Configuration for more options to adjust your PDF.
Create a link for customers to download
Next, you'll want to produce an actual link for your customer to download their PDF voucher. In most cases, this will be on the order summary page, an email, or both.
For example, on our order summary template (shop/customer/order.html), we have the following code looping through line items for the order. You can use the following single-line Twig variable:
{% for item in order.lineItems %}
    <a href="{{ craft.giftVoucher.getPdfUrl(item) }}">Download Gift Voucher</a>
{% endfor %}
This will output an anchor tag with a link to the gift voucher. You can also render all vouchers in a single PDF, as opposed to each line item as a separate PDF. Simple amend the template call to:
<a href="{{ craft.giftVoucher.getOrderPdfUrl(order) }}">Download All Gift Vouchers</a>In both cases, the URL will look something similar to:
https://mysite.local/actions/gift-voucher/downloads/pdf?number=ba018a32b43cfef51c031f61ec4d2c48&lineItemId=12
This URL will be using the template you have defined under the Gift Voucher plugin settings.
Additional parameters
You may find the additional parameters useful, especially during testing and development of these templates. Simply use one of the following values to append to the URL produced above.
&attach=false- Add this to not force the PDF to download. Instead, it'll be rendered inside the browser window. This will still render as a PDF and is useful for debugging layout issues.&format=plain- Produces the same template as HTML, as opposed to PDF. Again, useful for debugging layout issues, or quickly prototyping layouts.
Template variables
In the template itself, you'll have access to the following Twig variables:
order
The parent order that this voucher was purchased from
codes
A collection of Codes. Depending on if you are using the functionality to show all vouchers for the order, or just per line item will dictate the amount of models in this collection.
Custom Fields
If you have added any custom fields to your Code field layout (in the Gift Voucher plugin settings), you can also use those custom fields in your templates.
{% for code in codes %}
    {{ code.currentAmount | currency }}
    {{ code.voucher.title }}

    {# A custom plain text field with the handle `message` #}
    {{ code.message }}
{% endfor %}
Make sure you follow our guide for adding custom fields to vouchers when adding them to the cart. Otherwise, your custom fields won't have any content when codes are generated.
Example template
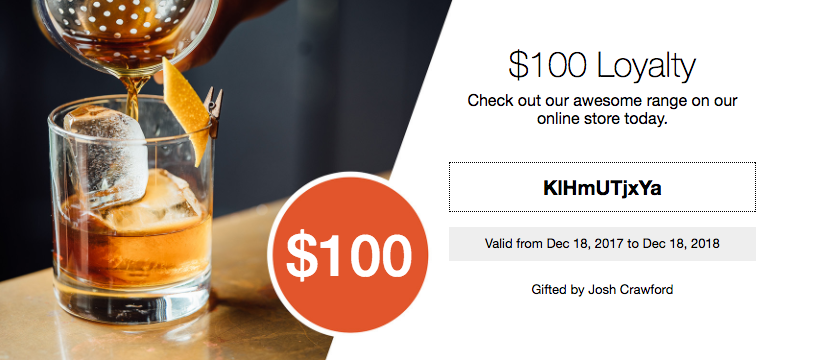
Below we've prepared a ready-to-go template, complete with provided CSS to get you started quickly.
<html>
<head>
    <meta http-equiv="content-type" content="text/html; charset=utf-8" />
    <style>
        html {
            margin-top: 0in !important;
            margin-left: 0in !important;
        }

        @page {
            margin: 0px;
        }

        body {
            font-family: Helvetica, Arial, sans-serif;
            font-size: 13px;
            line-height: 1.4em;
            margin: 0px;
        }

        .voucher {
            width: 8in;
            height: 3.77in;
            position: relative;
        }


        .voucher-img {
            max-width: 100%;
            height: auto;
            position: relative;
        }

        .field-amount {
            position: absolute;
            top: 178px;
            right: 337px;
            color: #fff;
            font-size: 57px;
            font-weight: bolder;
            width: 155px;
            height: 156px;
            line-height: 57px;
            text-align: center;
        }

        .field-amount span {
            position: absolute;
            top: 50%;
            left: 0;
            width: 100%;
            margin-top: -25px;
        }

        .field-content {
            position: absolute;
            width: 40%;
            right: 10px;
            top: 48px;
            text-align: center;
        }

        .demo-title {
            font-size: 35px;
            font-weight: lighter;
            line-height: 1;
        }

        .demo-p {
            font-size: 16px;
            font-weight: normal;
            margin-top: 10px;
        }

        .field-code {
            padding: 15px;
            border: 1px dotted;
            margin: 35px 0 15px;
            font-size: 20px;
            font-weight: bold;
        }

        .field-expiry {
            padding: 8px 13px;
            background: #eee;
        }

        .field-customer {
            margin-top: 20px;
        }
    </style>
</head>

<body>

{% for code in codes %}
    <div class="voucher">
        <img class="voucher-img" src="https://verbb.imgix.net/plugins/gift-voucher/gift-card-img.jpg" />

        <div class="field-amount">
            <span>{{ code.currentAmount | currency(null, [], [], true) }}</span>
        </div>

        <div class="field-content">
            <div class="demo-title">{{ code.voucher.title }}</div>
            <div class="demo-p">Check out our awesome range on our online store today.</div>

            <div class="field-code">{{ code.codeKey }}</div>

            {% if code.expiryDate %}
                <div class="field-expiry">Valid from {{ code.voucher.dateCreated | date("M j, Y") }} to {{ code.expiryDate | date("M j, Y") }}</div>
            {% endif %}

            {% if order and order.customer.user %}
                <div class="field-customer">Gifted by {{ order.customer.user.name }}</div>
            {% endif %}
        </div>
    </div>
{% endfor %}

</body>
</html>
The above will produce a design similar to the below, which we of course encourage you to change to your needs!