CRM
CRM integrations are one of the provided integrations with Formie, and are used for a variety of different needs. Mostly commonly, this integration pushes data related to “Contacts” and “Leads”. Each provider will have different names and available data available to be mapped. For instance, you might want to add someone to a “Potentials” list in your CRM, so you can follow up with later, or build complex automations.
Formie uses Craft‘s Queue system to send data to third-party providers. When a submission is successful a job is added to the queue so that it can be processed asynchronously.

You can create CRM integrations by going to Formie → Settings → CRM. You can pick from a list of providers Formie supports, and provide details for connecting to their respective APIs. You can also create multiple CRM integrations, in case you need to connect to multiple, different providers.
You can also test the connection to the APIs, to ensure that your site and Formie can communicate with the API.
Once created, enabled and connected, these integrations will be available to configure in your forms.
Refresh Integration
Formie will fetch a number of data objects for the provider - each being specific to the provider. These objects are cached for performance, you can also refresh the available data objects if they change.
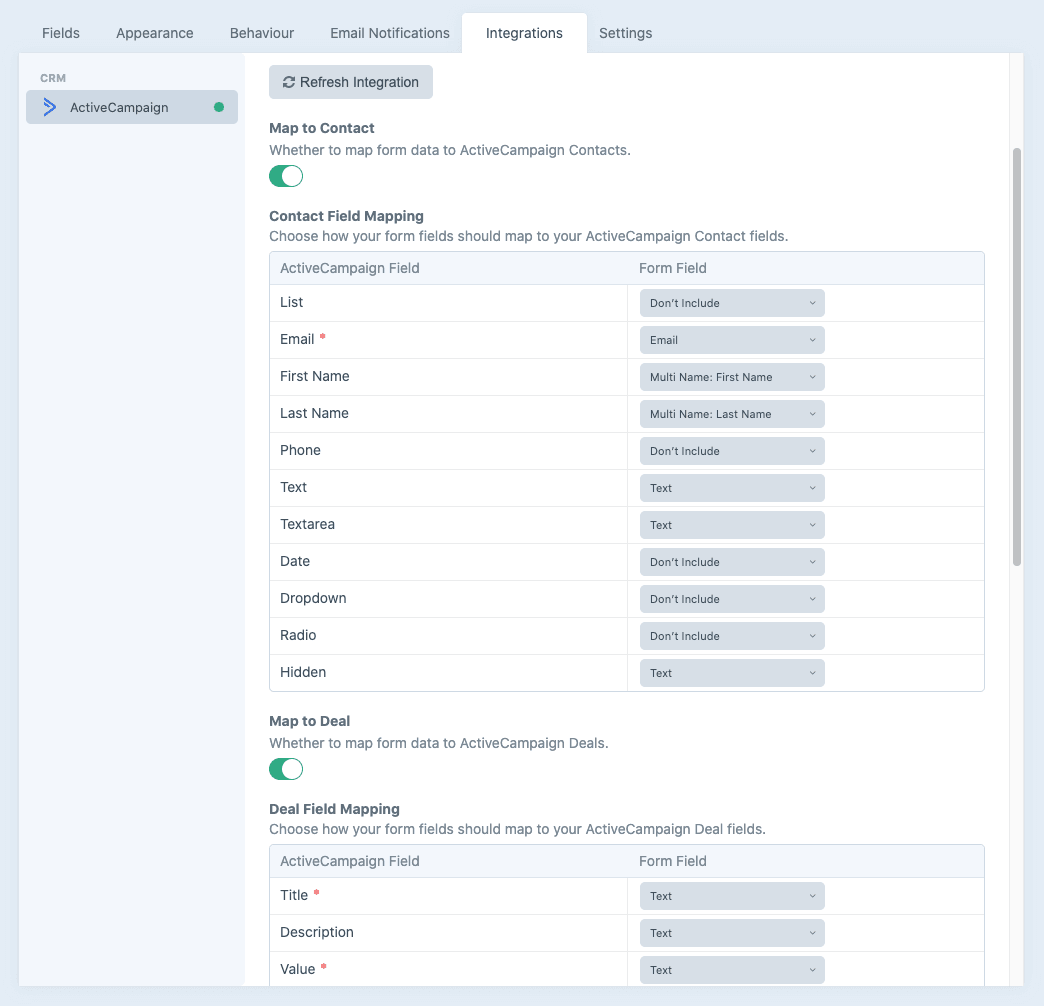
Field Mapping
For each data object, Formie will also fetch all available fields, and any provider-specific fields for a particular CRM provider or data object. You can map which Formie fields should have their values connected to their third-party field counterpart. Each field mapping field can be opted-in, in case you don't require mapping content to all data objects.
Supported Providers
Formie integrates with the following providers:
- ActiveCampaign
- Agile CRM
- Avochato
- Capsule CRM
- Copper CRM
- Freshdesk
- Freshsales
- HubSpot
- Infusionsoft
- Insightly
- Klaviyo
- Maximizer
- Mercury
- Microsoft Dynamics 365
- Pardot
- Pipedrive
- Pipeliner
- Salesflare
- Salesforce
- Scoro
- SharpSpring
- SugarCRM
- vCita
- Zoho
Is your provider not in the list above? Contact us to submit your interest, or look at the Custom Integration docs to write your own provider support.
ActiveCampaign
Follow the below steps to connect to the ActiveCampaign API.
Step 1. Create the Integration
- Navigate to Formie → Settings → CRM.
- Click the New Integration button.
- Select ActiveCampaign as the Integration Provider.
Step 2. Connect to the ActiveCampaign API
- Go to ActiveCampaign and login to your account.
- In the left-hand menu, click Settings.
- In the left-hand sub-menu, click Developer.
- Copy the API URL from ActiveCampaign and paste in the API URL field in Formie.
- Copy the API Key from ActiveCampaign and paste in the API Key field in Formie.
Step 3. Test Connection
- Save this integration.
- Click on the Refresh button in the right-hand sidebar.
Step 4. Form Setting
- Go to the form you want to enable this integration on.
- Click the Integrations tab.
- In the left-hand sidebar, select the name you gave the integration.
- Enable the integration and fill out all required fields.
- Click Save to save the form.
Agile CRM
Follow the below steps to connect to the Agile CRM API.
Step 1. Create the Integration
- Navigate to Formie → Settings → CRM.
- Click the New Integration button.
- Select Agile CRM as the Integration Provider.
Step 2. Connect to the Agile CRM API
- Go to Agile CRM and login to your account.
- Click on your profile dropdown on the top-right of the screen, and select Admin Settings.
- Click on the Developers & API menu in the left-hand sidebar.
- Copy the REST API from Agile CRM and paste in the API Key field in Formie.
- Enter the email for your Agile CRM account in the API Email field in Formie.
- Enter the full domain (including
https://) for your Agile CRM account in the Domain field in Formie.
Step 3. Test Connection
- Save this integration.
- Click on the Refresh button in the right-hand sidebar.
Step 4. Form Setting
- Go to the form you want to enable this integration on.
- Click the Integrations tab.
- In the left-hand sidebar, select the name you gave the integration.
- Enable the integration and fill out all required fields.
- Click Save to save the form.
Avochato
Follow the below steps to connect to the Avochato API.
Step 1. Create the Integration
- Navigate to Formie → Settings → CRM.
- Click the New Integration button.
- Select Avochato as the Integration Provider.
Step 2. Connect to the Avochato API
- Go to Avochato and login to your account.
- In the left-hand sidebar menu, click on Settings.
- Click the Generate Credentials button.
- Copy the Auth ID from Avochato and paste in the Auth ID field in Formie.
- Copy the Auth Secret from Avochato and paste in the Auth Secret field in Formie.
Step 3. Test Connection
- Save this integration.
- Click on the Refresh button in the right-hand sidebar.
Step 4. Form Setting
- Go to the form you want to enable this integration on.
- Click the Integrations tab.
- In the left-hand sidebar, select the name you gave the integration.
- Enable the integration and fill out all required fields.
- Click Save to save the form.
Capsule
Follow the below steps to connect to the Capsule API.
Step 1. Create the Integration
- Navigate to Formie → Settings → CRM.
- Click the New Integration button.
- Select Capsule as the Integration Provider.
Step 2. Connect to the Capsule API
- Click on your profile dropdown on the top-right of the screen, and select My Preferences.
- Click the API Authentication Tokens button.
- Click the Generate new API token button.
- Copy the API Key from Capsule and paste in the API Key in Formie.
Step 3. Test Connection
- Save this integration.
- Click on the Refresh button in the right-hand sidebar.
Step 4. Form Setting
- Go to the form you want to enable this integration on.
- Click the Integrations tab.
- In the left-hand sidebar, select the name you gave the integration.
- Enable the integration and fill out all required fields.
- Click Save to save the form.
Copper
Follow the below steps to connect to the Copper API.
Step 1. Create the Integration
- Navigate to Formie → Settings → CRM.
- Click the New Integration button.
- Select Copper as the Integration Provider.
Step 2. Connect to the Copper API
- Go to Copper and login to your account.
- Click on the Settings menu in the left-hand sidebar.
- Click on the Integration menu in the left-hand sidebar and select API Keys.
- Click the Generate API Key button.
- Copy the API Key from Copper and paste in the API Key field in Formie.
- Enter the email for your Copper account in the API Email field in Formie.
Step 3. Test Connection
- Save this integration.
- Click on the Refresh button in the right-hand sidebar.
Step 4. Form Setting
- Go to the form you want to enable this integration on.
- Click the Integrations tab.
- In the left-hand sidebar, select the name you gave the integration.
- Enable the integration and fill out all required fields.
- Click Save to save the form.
Freshdesk
Follow the below steps to connect to the Freshdesk API.
Step 1. Create the Integration
- Navigate to Formie → Settings → CRM.
- Click the New Integration button.
- Select Freshdesk as the Integration Provider.
Step 2. Connect to the Freshdesk API
- Go to Freshdesk and login to your account.
- Click on your profile dropdown on the top-right of the screen, and select Profile Settings.
- Copy the API Key from Freshdesk and paste in the API Key field in Formie.
Step 3. Test Connection
- Save this integration.
- Click on the Refresh button in the right-hand sidebar.
Step 4. Form Setting
- Go to the form you want to enable this integration on.
- Click the Integrations tab.
- In the left-hand sidebar, select the name you gave the integration.
- Enable the integration and fill out all required fields.
- Click Save to save the form.
Freshsales
Follow the below steps to connect to the Freshdesk API.
Step 1. Create the Integration
- Navigate to Formie → Settings → CRM.
- Click the New Integration button.
- Select Freshsales as the Integration Provider.
Step 2. Connect to the Freshdesk API
- Go to Freshsales and login to your account.
- Click on your profile dropdown on the top-right of the screen, and select Settings.
- Click on the API Settings button.
- Copy the API Key from Freshdesk and paste in the API Key field in Formie.
Step 3. Test Connection
- Save this integration.
- Click on the Refresh button in the right-hand sidebar.
Step 4. Form Setting
- Go to the form you want to enable this integration on.
- Click the Integrations tab.
- In the left-hand sidebar, select the name you gave the integration.
- Enable the integration and fill out all required fields.
- Click Save to save the form.
HubSpot
Follow the below steps to connect to the HubSpot API.
Step 1. Create the Integration
- Navigate to Formie → Settings → CRM.
- Click the New Integration button.
- Select HubSpot as the Integration Provider.
Step 2. Connect to the HubSpot API
- Go to HubSpot and login to your account.
- Click on the settings icon on the top-right of the screen.
- In the left-hand sidebar menu, click on Integrations → API key.
- Copy the API Key from HubSpot and paste in the API Key field in Formie.
Step 3. Test Connection
- Save this integration.
- Click on the Refresh button in the right-hand sidebar.
Step 4. Form Setting
- Go to the form you want to enable this integration on.
- Click the Integrations tab.
- In the left-hand sidebar, select the name you gave the integration.
- Enable the integration and fill out all required fields.
- Click Save to save the form.
Infusionsoft
Follow the below steps to connect to the Infusionsoft API.
Step 1. Create the Integration
- Navigate to Formie → Settings → CRM.
- Click the New Integration button.
- Select Infusionsoft as the Integration Provider.
Step 2. Connect to the Infusionsoft API
- Go to Keap Developer Account and login to your account.
- Click on your profile dropdown on the top-right of the screen, and select Apps.
- Click the + New App button.
- Fill out the required details, and be sure to enable APIs (small green icon button).
- Click the Create button.
- Copy the Key from Infusionsoft and paste in the Client ID field in Formie.
- Copy the Secret from Infusionsoft and paste in the Client Secret field in Formie.
Step 3. Test Connection
- Save this integration.
- Click on the Connect button in the right-hand sidebar.
- You‘ll be redirected to Infusionsoft, where you must approve Formie to access your Infusionsoft account.
Step 4. Form Setting
- Go to the form you want to enable this integration on.
- Click the Integrations tab.
- In the left-hand sidebar, select the name you gave the integration.
- Enable the integration and fill out all required fields.
- Click Save to save the form.
Insightly
Follow the below steps to connect to the Insightly API.
Step 1. Create the Integration
- Navigate to Formie → Settings → CRM.
- Click the New Integration button.
- Select Insightly as the Integration Provider.
Step 2. Connect to the Insightly API
- Go to Insightly and login to your account.
- Click on your profile dropdown on the top-right of the screen, and select User Settings.
- Copy the API Key from Insightly and paste in the API Key field in Formie.
Step 3. Test Connection
- Save this integration.
- Click on the Refresh button in the right-hand sidebar.
Step 4. Form Setting
- Go to the form you want to enable this integration on.
- Click the Integrations tab.
- In the left-hand sidebar, select the name you gave the integration.
- Enable the integration and fill out all required fields.
- Click Save to save the form.
Klaviyo
Follow the below steps to connect to the Klaviyo API.
Step 1. Create the Integration
- Navigate to Formie → Settings → CRM.
- Click the New Integration button.
- Select Klaviyo as the Integration Provider.
Step 2. Connect to the Klaviyo API
- Go to Klaviyo and login to your account.
- Click on your profile dropdown on the top-right of the screen, and select Account.
- Click the Settings dropdown and click API Keys.
- Copy the Public API Key from Klaviyo and paste in the Public API Key field in Formie.
- Click the Create Private API Key button.
- Copy the Private API Key from Klaviyo and paste in the Private API Key field in Formie.
Step 3. Test Connection
- Save this integration.
- Click on the Refresh button in the right-hand sidebar.
Step 4. Form Setting
- Go to the form you want to enable this integration on.
- Click the Integrations tab.
- In the left-hand sidebar, select the name you gave the integration.
- Enable the integration and fill out all required fields.
- Click Save to save the form.
Maximizer
Follow the below steps to connect to the Maximizer API.
Step 1. Create the Integration
- Navigate to Formie → Settings → CRM.
- Click the New Integration button.
- Select Maximizer as the Integration Provider.
Step 2. Connect to the Maximizer API
- Go to Maximizer CRM API and request access to their API.
- When approved, you'll receive your details via email.
- Enter your Username from Maximizer and paste in the Username field in Formie.
- Enter your Password from Maximizer and paste in the Password field in Formie.
- Copy the Web Access URL from Maximizer and paste in the Web Access URL field in Formie.
- Copy the Database ID from Maximizer and paste in the Database ID field in Formie.
- Copy the Vendor ID from Maximizer and paste in the Vendor ID field in Formie.
- Copy the App Key from Maximizer and paste in the App Key field in Formie.
Step 3. Test Connection
- Save this integration.
- Click on the Refresh button in the right-hand sidebar.
Step 4. Form Setting
- Go to the form you want to enable this integration on.
- Click the Integrations tab.
- In the left-hand sidebar, select the name you gave the integration.
- Enable the integration and fill out all required fields.
- Click Save to save the form.
Mercury (by Connective)
Follow the below steps to connect to the Connective Mercury API.
Step 1. Create the Integration
- Navigate to Formie → Settings → CRM.
- Click the New Integration button.
- Select Mercury as the Integration Provider.
Step 2. Connect to the Connective Mercury API
- Go to Connective and login to your Mercury account.
- In the top menu, click the Admin tab.
- In the left-hand sidebar menu, click the Integrations tab.
- Copy the API Key from Mercury and paste in the API Key field in Formie.
- Copy the API Token from Mercury and paste in the API Token field in Formie.
Step 3. Test Connection
- Save this integration.
- Click on the Refresh button in the right-hand sidebar.
Step 4. Form Setting
- Go to the form you want to enable this integration on.
- Click the Integrations tab.
- In the left-hand sidebar, select the name you gave the integration.
- Enable the integration and fill out all required fields.
- Click Save to save the form.
Microsoft Dynamics 365
Follow the below steps to connect to the Microsoft Dynamics 365 API.
Step 1. Create the Integration
- Navigate to Formie → Settings → CRM.
- Click the New Integration button.
- Select Microsoft Dynamics 365 as the Integration Provider.
Step 2. Connect to the Microsoft Dynamics 365 API
- Go to Azure Active Directory Admin Center and login to your account.
- Click on the Azure Active Directory in the left-hand sidebar, App Registrations then New Registration.
- Under Supported account types select Accounts in any organizational directory (Any Azure AD directory - Multitenant) and personal Microsoft accounts (e.g. Skype, Xbox).
- In the Redirect URI field, enter the value from the Redirect URI field in Formie.
- Click the Register button.
- Copy the Application (client) ID from Microsoft Dynamics 365 and paste in the Client ID field in Formie.
- Click on the Certificates & Secrets in the left-hand sidebar.
- Click the New client secret button and provide a name and appropriate expiry.
- Copy the Value from Microsoft Dynamics 365 for the resulting secret and paste in the Client Secret field below.
- Click on the API Permissions in the left-hand sidebar.
- Click the Add a Permission button.
- Select Microsoft Graph, then the Delegated permissions option and select the following permissions:
emailoffline_accessopenidprofile
- Click Add Permissions.
- Navigate back to All APIs and select Dynamics CRM and select the following permissions:
user_impersonation
- Click Add Permissions.
- Navigate back to API Permissions and click the Grant Admin Consent button, and agree to the prompt.
Step 3. Create an Application User
- Go to Power Platform Admin Center and login to your account as a System Administrator.
- Click Environments in the left-hand sidebar, and then select an environment from the list.
- Copy the Environment URL from Power Platform and paste in the Domain field in Formie. Be sure to include the
https://(e.g.https://ffcor.crm6.dynamics.com). - Click the Settings button in the top navigation.
- Click Users + Permissions, and then click Application Users.
- Click the + New app user button in the top navigation.
- Click + Add an app to choose the registered Azure AD application that was created for the selected user, and then click the Add button.
- Select a business unit from the dropdown list for Business Unit.
- Click Security roles and add the following:
Basic User
- Click the Save button, then the Create button.
Step 4. Test Connection
- Save this integration.
- Click on the Connect button in the right-hand sidebar.
- You‘ll be redirected to Microsoft Dynamics 365, where you must approve Formie to access your Microsoft Dynamics 365 account.
Step 5. Form Setting
- Go to the form you want to enable this integration on.
- Click the Integrations tab.
- In the left-hand sidebar, select the name you gave the integration.
- Enable the integration and fill out all required fields.
- Click Save to save the form.
Optional: Microsoft Dynamics 365 Web API version
The Microsoft Dynamics 365 Web API provides different versions of the Web API (opens new window). This is to both maintain compatibility or implement new breaking changes. There are no major differences between v9.0, v9.1 or v9.2 currently. This setting allows you to specify a specific API version if required. When setting a specific value, all Microsoft Dynamics 365 Web API requests will use this API version in the request URI.
For compatibility, the default setting is v9.0. This has been the value used in the Microsoft Dynamics 365 CRM integration prior to this being customisable.
Pardot
Follow the below steps to connect to the Pardot API.
Step 1. Create the Integration
- Navigate to Formie → Settings → CRM.
- Click the New Integration button.
- Select Pardot as the Integration Provider.
Step 2. Connect to the Pardot API
- Go to Pardot and login to your account.
- In the main menu, on the top-right, click the Settings icon and select Setup.
- In the left-hand sidebar, click on Apps → App Manager.
- Click the New Connected App button.
- Fill out all required fields.
- In the API (Enable OAuth Settings) section, tick the Enable OAuth Settings checkbox.
- In the Callback URL field, enter the value from the Redirect URI field in Formie.
- In the Selected OAuth Scopes field, select the following permissions from the list and click Add arrow button:
- Manage Pardot services (pardot_api).
- Perform requests on your behalf at any time (refresh_token, offline_access).
- Click the Save button.
- Copy the Consumer Key from Pardot and paste in the Consumer Key field in Formie.
- Copy the Consumer Secret from Pardot and paste in the Consumer Secret field in Formie.
- Click on the Manage button.
- Click on the Edit Policies button.
- In the OAuth policies section:
- In the Permitted Users field, select All users may self-authorize.
- In the IP Relaxation field, select Relaxed IP restrictions.
- Click the Save button.
- In the left-hand side menu, select Pardot → Pardot Account Setup.
- Copy the Business Unit ID from Pardot and paste in the Business Unit ID field in Formie.
Step 3. Test Connection
- Save this integration.
- Click on the Connect button in the right-hand sidebar.
- You‘ll be redirected to Pardot, where you must approve Formie to access your Pardot account.
Step 4. Form Setting
- Go to the form you want to enable this integration on.
- Click the Integrations tab.
- In the left-hand sidebar, select the name you gave the integration.
- Enable the integration and fill out all required fields.
- Click Save to save the form.
Pipedrive
Follow the below steps to connect to the Pipedrive API.
Step 1. Create the Integration
- Navigate to Formie → Settings → CRM.
- Click the New Integration button.
- Select Pipedrive as the Integration Provider.
Step 2. Connect to the Pipedrive API
- Go to Pipedrive and login to your account.
- Click on your profile dropdown on the top-right of the screen, and select Personal Preferences.
- Click on the API tab.
- Copy the Your personal API token from Pipedrive and paste in the API Key field in Formie.
Step 3. Test Connection
- Save this integration.
- Click on the Refresh button in the right-hand sidebar.
Step 4. Form Setting
- Go to the form you want to enable this integration on.
- Click the Integrations tab.
- In the left-hand sidebar, select the name you gave the integration.
- Enable the integration and fill out all required fields.
- Click Save to save the form.
Pipeliner
Follow the below steps to connect to the Pipeliner API.
Step 1. Create the Integration
- Navigate to Formie → Settings → CRM.
- Click the New Integration button.
- Select Pipeliner as the Integration Provider.
Step 2. Connect to the Pipeliner API
- Go to Pipeliner and login to your account.
- In the top main menu, click on Menu icon in the far-left of the screen (9 dots).
- In the top sub-menu, click on the Obtain API Key.
- Copy the API Token from Pipeliner and paste in the API Token field in Formie.
- Copy the API Password from Pipeliner and paste in the API Password field in Formie.
- Copy the API Space ID from Pipeliner and paste in the API Space ID field in Formie.
Step 3. Test Connection
- Save this integration.
- Click on the Refresh button in the right-hand sidebar.
Step 4. Form Setting
- Go to the form you want to enable this integration on.
- Click the Integrations tab.
- In the left-hand sidebar, select the name you gave the integration.
- Enable the integration and fill out all required fields.
- Click Save to save the form.
Salesflare
Follow the below steps to connect to the Salesflare API.
Step 1. Create the Integration
- Navigate to Formie → Settings → CRM.
- Click the New Integration button.
- Select Salesflare as the Integration Provider.
Step 2. Connect to the Salesflare API
- Go to Salesflare and login to your account.
- In the left-hand sidebar menu, click the Settings icon.
- In the left-hand sidebar sub-menu, click on API Keys.
- Click on the large + add button in the bottom-right of the screen.
- Copy the API Key from Salesflare and paste in the API Key field in Formie.
Step 3. Test Connection
- Save this integration.
- Click on the Refresh button in the right-hand sidebar.
Step 4. Form Setting
- Go to the form you want to enable this integration on.
- Click the Integrations tab.
- In the left-hand sidebar, select the name you gave the integration.
- Enable the integration and fill out all required fields.
- Click Save to save the form.
Salesforce
Follow the below steps to connect to the Salesforce API.
Step 1. Create the Integration
- Navigate to Formie → Settings → CRM.
- Click the New Integration button.
- Select Salesforce as the Integration Provider.
Step 2. Connect to the Salesforce API
- Go to Salesforce and login to your account.
- In the main menu, on the top-right, click the Settings icon and select Setup.
- In the left-hand sidebar, click on Apps → App Manager.
- Click the New Connected App button.
- Fill out all required fields.
- In the API (Enable OAuth Settings) section, tick the Enable OAuth Settings checkbox.
- In the Callback URL field, enter the value from the Redirect URI field in Formie.
- In the Selected OAuth Scopes field, select the following permissions from the list and click Add arrow button:
- Access and manage your data (api)
- Allow access to your unique identifier (openid).
- Perform requests on your behalf at any time (refresh_token, offline_access).
- Click the Save button.
- Copy the Consumer Key from Salesforce and paste in the Consumer Key field in Formie.
- Copy the Consumer Secret from Salesforce and paste in the Consumer Secret field in Formie.
- Click on the Manage button.
- Click on the Edit Policies button.
- In the OAuth policies section:
- In the Permitted Users field, select All users may self-authorize.
- In the IP Relaxation field, select Relaxed IP restrictions.
- Click the Save button.
Step 3. Test Connection
- Save this integration.
- Click on the Connect button in the right-hand sidebar.
- You‘ll be redirected to Salesforce, where you must approve Formie to access your Salesforce account.
Step 4. Form Setting
- Go to the form you want to enable this integration on.
- Click the Integrations tab.
- In the left-hand sidebar, select the name you gave the integration.
- Enable the integration and fill out all required fields.
- Click Save to save the form.
Scoro
Follow the below steps to connect to the Scoro API.
Step 1. Create the Integration
- Navigate to Formie → Settings → CRM.
- Click the New Integration button.
- Select Scoro as the Integration Provider.
Step 2. Connect to the Scoro API
- Go to Scoro and login to your account.
- Click on your profile dropdown on the top-right of the screen, and select Profile Settings.
- Click on Site Settings → Integrations.
- Under the General heading, click on Scoro API.
- Copy the API Key from Scoro and paste in the API Key field in Formie.
Step 3. Test Connection
- Save this integration.
- Click on the Refresh button in the right-hand sidebar.
Step 4. Form Setting
- Go to the form you want to enable this integration on.
- Click the Integrations tab.
- In the left-hand sidebar, select the name you gave the integration.
- Enable the integration and fill out all required fields.
- Click Save to save the form.
SharpSpring
Follow the below steps to connect to the SharpSpring API.
Step 1. Create the Integration
- Navigate to Formie → Settings → CRM.
- Click the New Integration button.
- Select SharpSpring as the Integration Provider.
Step 2. Connect to the SharpSpring API
- Go to SharpSpring and login to your account.
- Click on your profile dropdown on the top-right of the screen, and select Settings.
- In the left-hand sidebar menu, click on API Settings.
- Click the Generate New API Keys button.
- Copy the Account ID from SharpSpring and paste in the Account ID field in Formie.
- Copy the Secret Key from SharpSpring and paste in the Secret Key field in Formie.
Step 3. Test Connection
- Save this integration.
- Click on the Refresh button in the right-hand sidebar.
Step 4. Form Setting
- Go to the form you want to enable this integration on.
- Click the Integrations tab.
- In the left-hand sidebar, select the name you gave the integration.
- Enable the integration and fill out all required fields.
- Click Save to save the form.
SugarCRM
Follow the below steps to connect to the SugarCRM API.
Step 1. Create the Integration
- Navigate to Formie → Settings → CRM.
- Click the New Integration button.
- Select SugarCRM as the Integration Provider.
Step 2. Connect to the SugarCRM API
- Go to SugarCRM and login to your account.
- Click on your profile dropdown on the top-right of the screen, and select Admin.
- Find and click the Configure API Platforms link.
- Below the table of API Platforms, enter
formiein the add field, and click the Add button. This will addformieto the table of platforms. - Enter the username for your SugarCRM account in the Username field in Formie.
- Enter the password for your SugarCRM account in the Password field in Formie.
- Enter the full domain (including
https://) for your SugarCRM account in the Domain field in Formie.
Step 3. Test Connection
- Save this integration.
- Click on the Connect button in the right-hand sidebar.
Step 4. Form Setting
- Go to the form you want to enable this integration on.
- Click the Integrations tab.
- In the left-hand sidebar, select the name you gave the integration.
- Enable the integration and fill out all required fields.
- Click Save to save the form.
vCita
Follow the below steps to connect to the vCita API.
Step 1. Create the Integration
- Navigate to Formie → Settings → CRM.
- Click the New Integration button.
- Select vCita as the Integration Provider.
Step 2. Connect to the vCita API
- Go to vCita and login to your account.
- In the left-hand sidebar menu, click on Settings.
- Click on Integrations.
- Find Webhooks and click on the Connect button.
- Copy the App Token from vCita and paste in the App Key field in Formie.
Step 3. Test Connection
- Save this integration.
- Click on the Refresh button in the right-hand sidebar.
Step 4. Form Setting
- Go to the form you want to enable this integration on.
- Click the Integrations tab.
- In the left-hand sidebar, select the name you gave the integration.
- Enable the integration and fill out all required fields.
- Click Save to save the form.
Zoho
Follow the below steps to connect to the Zoho API.
Step 1. Create the Integration
- Navigate to Formie → Settings → CRM.
- Click the New Integration button.
- Select Zoho as the Integration Provider.
Step 2. Connect to the Zoho API
- Go to Zoho API Console and login to your account.
- Click the Add Client button.
- Click Server-based Applications.
- In the Authorized Redirect URIs field, enter the value from the Redirect URI field in Formie.
- Copy the Client ID from Zoho and paste in the Client ID field in Formie.
- Copy the Client Secret from Zoho and paste in the Client Secret field in Formie.
Step 3. Test Connection
- Save this integration.
- Click on the Connect button in the right-hand sidebar.
- You‘ll be redirected to Zoho, where you must approve Formie to access your Zoho account.
Step 4. Form Setting
- Go to the form you want to enable this integration on.
- Click the Integrations tab.
- In the left-hand sidebar, select the name you gave the integration.
- Enable the integration and fill out all required fields.
- Click Save to save the form.